Fork Flickin': Difference between revisions
Added Minimum Captures section |
→Minimum Captures: Added info about attempted methods |
||
| Line 13: | Line 13: | ||
== Minimum Captures == | == Minimum Captures == | ||
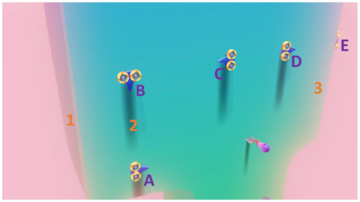
[[File:Fork Flickin Min Captures 1.png|thumb|360x360px|Left view]] | |||
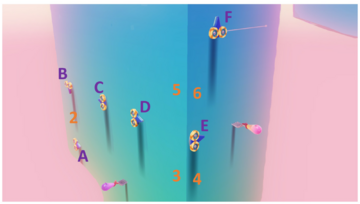
[[File:Fork Flickin Min Captures 2.png|thumb|360x360px|Middle view]] | |||
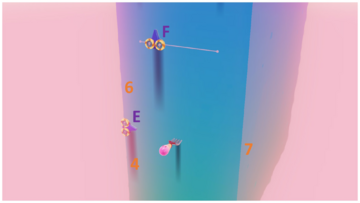
[[File:Fork Flickin Min Captures 3.png|thumb|360x360px|Right view]] | |||
Both [[Power Moon|Power Moons]] in the Fork Flickin' room are among the most heavily theorized moons for [[Minimum Captures]]. Currently, it is only known to be possible to scale the first several smaller ledges without capturing any of the forks, with no known way of scaling the final large wall in its entirety. | Both [[Power Moon|Power Moons]] in the Fork Flickin' room are among the most heavily theorized moons for [[Minimum Captures]]. Currently, it is only known to be possible to scale the first several smaller ledges without capturing any of the forks, with no known way of scaling the final large wall in its entirety. | ||
=== Attempted methods === | |||
After the player performs a [[wall jump]], the game will restrict the locations in which a subsequent wall jump can be performed until the player touches ground (or performs another action capable of resetting the wall jump ability). The challenge with climbing this section is that bouncing on a cap launcher does not replenish Mario's [[cap bounce]] nor reset his wall jump. Various sequences of wall jumps and other actions have been attempted in order to climb this section, but no such methods have been successful. | |||
The diagrams depict the numerous [[Cap launcher|cap launchers]] in the final section, each given a letter, as well as various potential spots to wall jump, each given a number. | |||
One can reach cap launcher A by simply performing a [[triple jump]] from the railing below followed by a cap bounce and [[dive]]. This uses Mario's cap bounce, but leaves his wall jumping unaffected. | |||
==References== | ==References== | ||
Revision as of 08:50, 20 August 2025
| Fork Flickin' | |
|---|---|

| |
| Internal name | ForkExStage |
| Moon Rock level? | No |
| Collectibles | |
| Power Moons | 2 |
| Regional coins | 3 |
| Trivia | |
| Music | Run, Jump, Throw! 1 |
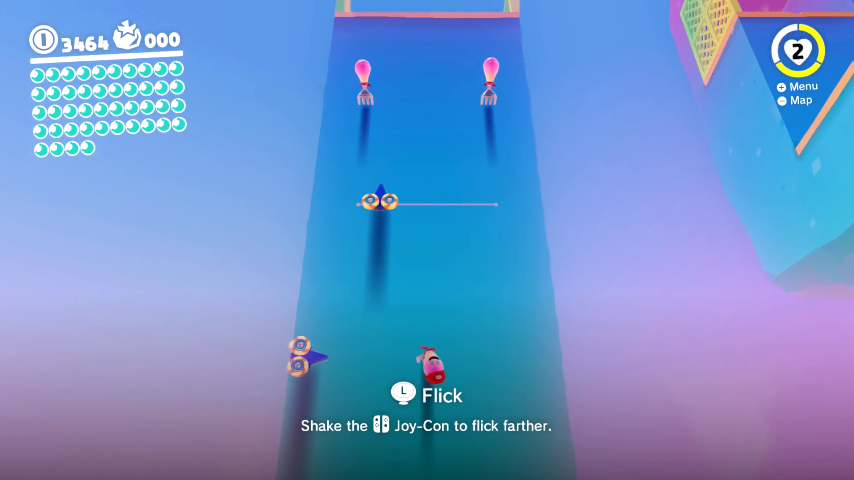
Fork Flickin' is a sub-world in Luncheon Kingdom found through a door on a small platform on the east side of the kingdom. The level involves capturing and flinging from Volbonans to scale a very tall wall.
Trivia
- It is possible to trickjump to the top of the colored rock formation above the secret moon. The easiest method involves vaulting from the platform above the level's exit,[1] but it can also be done by triple jumping from the fence and using a dive cancel against a specific slope to gain enough height to reach the top.[2]
Minimum Captures


Both Power Moons in the Fork Flickin' room are among the most heavily theorized moons for Minimum Captures. Currently, it is only known to be possible to scale the first several smaller ledges without capturing any of the forks, with no known way of scaling the final large wall in its entirety.
Attempted methods
After the player performs a wall jump, the game will restrict the locations in which a subsequent wall jump can be performed until the player touches ground (or performs another action capable of resetting the wall jump ability). The challenge with climbing this section is that bouncing on a cap launcher does not replenish Mario's cap bounce nor reset his wall jump. Various sequences of wall jumps and other actions have been attempted in order to climb this section, but no such methods have been successful.
The diagrams depict the numerous cap launchers in the final section, each given a letter, as well as various potential spots to wall jump, each given a number.
One can reach cap launcher A by simply performing a triple jump from the railing below followed by a cap bounce and dive. This uses Mario's cap bounce, but leaves his wall jumping unaffected.
References
| Levels | ||
|---|---|---|
| All Kingdoms | Odyssey | |
| Cap Kingdom | Overworld • Inside Top-Hat Tower • Poison Tide • Push-Block Peril • Frog Pond • Rolling Course | |
| Cascade Kingdom | Overworld • Dinosaur Nest • Chain Chomp Cave • Chasm Lifts • Mysterious Clouds • Gusty Bridges | |
| Sand Kingdom | Overworld • Inside the Inverted Pyramid • Inverted Pyramid Top Floor • Underground Temple • Deepest Underground • Ice Cave • Sphynx's Treasure Vault • Rumble Room • Dance Room • Invisible Maze • Bullet Bill Maze • Jaxi Driving • Strange Neighborhood • Transparent Platforms • Colossal Ruins • Freezing Waterway • Crazy Cap • Slots | |
| Lake Kingdom | Overworld • Puzzle Part Room • Zipper Chasm • Climbing Room • Waves of Poison • Crazy Cap | |
| Wooded Kingdom | Overworld • Sky Garden Tower • Secret Flower Field • Spinning-Platforms Treasure Room • Deep Woods • Deep Woods Treasure Trap • Deep Woods Treasure Vault • Flooding Pipeway • Foggy Room • Flower Road Room • Elevator Shaft • Cloud Walking • Invisible Road • Herding Path • Breakdown Road | |
| Cloud Kingdom | Overworld • Picture Match • 8-Bit Cube | |
| Lost Kingdom | Overworld • Jungle Traverse • Klepto's Bath • Crazy Cap | |
| Metro Kingdom | Overworld • New Donk City Hall Interior • New Donk City Hall Auditorium • Underground Power Plant • Sewer Room • RC Car Racetrack • Private Room • Crowded Room • Wire Neighborhood • Under Siege • Rotating Maze • High-Rise Building • Bullet Billding • T-Rex Escape • Movie Theater • Pitchblack Mountain • Swinging Scaffolding • Vanishing Road • Crazy Cap • Slots | |
| Snow Kingdom | Overworld • Shiveria Town • Icicle Cavern • Hollow Crevasse • Wind-Chill Cavern • Snowy Mountain • Snowline Circuit • Iceburn Circuit • Trace-Walking Room • Cold Water Dash • Freezing Water Swim • Ty-foo Puzzle • Cold Room • Cloud Spinning • Flower Road Room • Crazy Cap | |
| Seaside Kingdom | Overworld • Underwater Tunnel to the Lighthouse • Wriggling Room • Sphynx's Underwater Vault • Rumble Room • Dance Room • Cloud Sea • Narrow Valley • Sinking Island • Pokio Valley • Spinning Maze | |
| Luncheon Kingdom | Overworld • Cascading Magma • Simmering Room • Veggie Treasure Vault • Magma Swamp • Magma Crossing • Fork Flickin' • Cheese Rocks Room • Spinning Athletics • Gear Steps • Volcano Cave • Lava Islands • Crazy Cap • Slots | |
| Ruined Kingdom | Overworld • Roulette Tower • Mummy Army | |
| Bowser's Kingdom | Overworld • Bowser's Castle Treasure Vault • Folding Screen • Spinning Tower • Jizo Adventure • Cloud Dash • Hexagon Tower • Wooden Tower • Crazy Cap | |
| Moon Kingdom | Overworld • Underground Moon Caverns • Wedding Hall • Bowser Arena • Escape • Sphynx's Hidden Vault • 8-Bit Galaxy • Giant Swings • Crazy Cap | |
| Mushroom Kingdom | Overworld • Inside Peach's Castle • Picture Match • Retro Courtyard • Sea of Clouds • Secret 2D Treasure • Rematch Lobby • Knucklotec Rematch • Torkdrift Rematch • Mechawiggler Rematch • Mollusque-Lanceur Rematch • Cookatiel Rematch • Ruined Dragon Rematch • Crazy Cap | |
| Dark Side | Overworld • Rabbit Ridge Tower • Breakdown Road • Invisible Road • Vanishing Road • Under Siege • Sinking Island • Magma Swamp | |
| Darker Side | Overworld • Darker Side Dungeon • Darker Side Pokio Area • Darker Side Bowser Area | |
| Nintendo Labo VR | Cap Kingdom (VR) • Seaside Kingdom (VR) • Luncheon Kingdom (VR) • Concert Hall (VR) | |
